Chocolate-dipped fruit centrepieces are a stunning way to combine food and decoration for any event. They’re perfect for birthdays, weddings, or corporate functions, offering not just visual appeal but also a shared, interactive experience. These arrangements can be tailored to seasonal fruits, event themes, or colour schemes, making them ideal for any occasion. Key steps include:
- Fruit Selection & Prep: Use fruits like strawberries, pineapple, or kiwi. Wash and dry them thoroughly to ensure the chocolate sticks.
- Chocolate Melting: Temper the chocolate using a double boiler or microwave for a smooth, glossy finish.
- Dipping Techniques: Try basic skewering, marbling, or piped designs for various effects. Add toppings like nuts, coconut, or edible flowers for extra texture.
- Assembly & Storage: Use florist foam for structure and keep the arrangement in a cool, dry area to maintain its look.
These centrepieces are easy to customise and can be made at home or styled professionally for larger events. With proper preparation and presentation, they’ll leave a lasting impression on your guests.
Tools, Ingredients, and Preparation
Fruit and Chocolate Selection
Strawberries are a favourite for dipping thanks to their sweetness, striking colour, and convenient shape. But don’t stop there – other fruits like pineapple, rockmelon, watermelon, bananas, mango, figs, kiwi, and blueberries also pair beautifully with chocolate. For an eye-catching twist, use cookie cutters to shape pineapple, rockmelon, or watermelon into flowers or geometric designs. Once you’ve picked your fruits, preparing them properly is key to ensuring the chocolate sticks.
Preparation Steps
After selecting and cutting your fruit, follow these steps to get them ready for dipping:
- Wash all the fruit in cold water and dry them thoroughly with a clean towel. Any excess moisture can stop the chocolate from sticking.
- For strawberries, keep the green tops on – they make a handy handle and add a nice pop of colour. Remove any bruised or overly soft spots.
- If you’re using apples or pears, dip the cut pieces in lemon water (mix half a lemon with 250 ml of water) to keep them from browning.
- Cut larger fruits into uniform, bite-sized pieces for easy eating.
- Let the fruit air dry completely before dipping – this step is crucial for getting the chocolate to stick properly.
Taking the time to prepare your fruit well not only improves the look but also ensures the chocolate coating stays smooth and firm.
Chocolate Melting and Dipping Methods
Melting Chocolate
Getting your chocolate to the right consistency is key to creating a stunning centrepiece. To achieve that glossy finish and crisp shell that clings perfectly to your fruit, tempering is essential. This process involves carefully heating and cooling chocolate to precise temperatures.
One reliable method is using a double boiler. Fill a saucepan with about 5 cm of simmering water and place a heatproof bowl on top, ensuring the bowl doesn’t touch the water. Add chopped chocolate to the bowl and stir occasionally until it melts and reaches the ideal temperature: around 46–49°C for dark chocolate, and 43–46°C for milk or white chocolate.
If you’re short on time, the microwave method works too. Break the chocolate into small, even pieces and heat it in 30-second bursts at 50% power. Stir between intervals to prevent overheating, which can cause the chocolate to seize and become unusable.
Make sure your fruit is at room temperature before dipping. Cold fruit can make the chocolate set unevenly. Also, skip adding oils to your chocolate – it can mess with the texture and make it harder for the chocolate to stick properly to the fruit.
Once your chocolate is smooth and ready, it’s time to dive into dipping techniques.
Basic and Advanced Dipping Methods
With perfectly tempered chocolate, you can explore a variety of dipping methods depending on the look you’re after. If you’re new to this, start with the basic skewer method. Simply thread your fruit onto wooden skewers or cocktail sticks, leaving enough space to hold comfortably. Dip the fruit at a slight angle, letting excess chocolate drip back into the bowl. A gentle shake or scrape will help remove any extra chocolate and prevent a “puddle” or thick base from forming.
For a more artistic touch, try the marbling technique. Melt two contrasting chocolates – like dark and white – and swirl them gently in your dipping bowl. When you dip your fruit, each piece will have a unique, marbled pattern that’s both elegant and eye-catching.
If you’re aiming for intricate designs, consider piped decorations. First, let the chocolate coating on your fruit set. Then, fill a disposable piping bag with a contrasting melted chocolate and pipe swirls, zigzags, or geometric patterns onto the surface. This approach is perfect for events where you want to match specific themes or colour schemes.
Another stylish option is creating two-tone effects. Begin by dipping the fruit in one colour of chocolate and letting it set. Then, drizzle a second colour over the top for a striking contrast. Just be sure to add the drizzle while the first layer is firm but not fully set. Avoid refrigerating the fruit between dips, as condensation can interfere with the chocolate’s ability to stick.
For an extra layer of appeal, consider adding toppings while the chocolate is still wet. Roll the dipped fruit in chopped nuts, desiccated coconut, or other toppings to add texture and visual interest. It’s a simple way to elevate the look of your chocolate-dipped creations and make them stand out as a centrepiece.
Flavour Combinations
Assembly and Presentation
Arranging the Fruit
Start by building a sturdy base to give your arrangement height and balance. Use florist foam cut to fit securely inside your chosen container – whether that’s a ceramic bowl, glass vase, or wooden box.
When inserting skewered fruit pieces, vary their heights for a dynamic effect. Place the tallest pieces in the centre and let shorter ones fan outwards to create a dome-like shape that naturally draws attention. Keep skewers spaced about 2–3 cm apart, and for heavier fruit, push them 3–4 cm deep into the foam to ensure stability.
For fruit pieces without skewers, small glass vases or shot glasses filled with decorative stones can help hold them upright.
To achieve a polished, professional look, layer your fruit thoughtfully. Begin with the largest, most eye-catching pieces, and then use smaller fruits to fill in the gaps. This approach ensures every angle of your arrangement looks intentional and well-crafted. Once the structure is complete, take a moment to tweak and fine-tune the display.
Styling and Display Tips
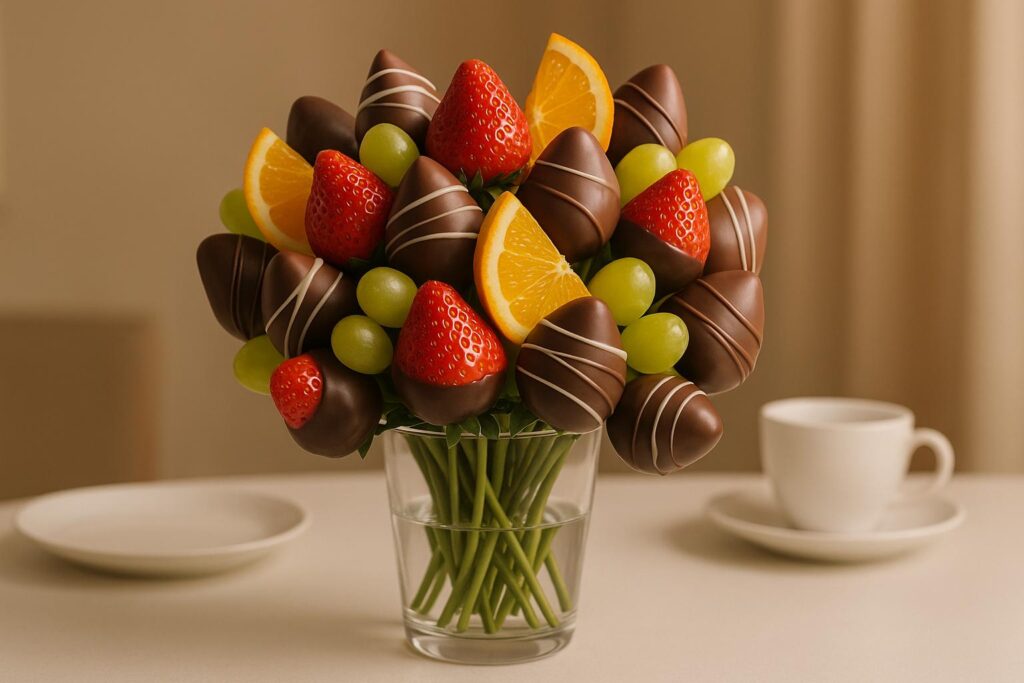
Colour coordination can elevate the visual appeal of your arrangement. For a sophisticated effect, group similar chocolate tones together, or alternate light and dark chocolates throughout. For instance, white chocolate-dipped strawberries pair beautifully with dark chocolate-covered grapes for a timeless look.
Consider the natural colours of the fruit as well. The deep orange of persimmons dipped in dark chocolate makes for a striking autumn centrepiece, while green grapes coated in white chocolate bring a fresh, summery vibe – perfect for outdoor gatherings under the Australian sun.
Adding native Australian foliage can make your display stand out. Eucalyptus branches, with their silvery-green leaves, complement chocolate tones and add a subtle fragrance. During wattle flowering season, bright yellow sprigs pair wonderfully with golden fruits like pineapple or mango, creating a vibrant, local touch.
For extra texture and colour, tuck edible flowers like pansies or violas between the fruit pieces. These delicate blooms enhance the display without overpowering your chocolate-dipped fruits. Just be sure to use food-safe, pesticide-free flowers.
Don’t forget the base of your arrangement. Scatter rose petals, mint leaves, or even chocolate shavings around it for a cohesive, finished look that ties the centrepiece into your overall table design.
Storage and Serving Guidelines
Once your centrepiece is assembled, storing it properly is crucial to maintain its look and taste. Aim to keep it at a temperature of 18–20°C, which is ideal for chocolate-dipped fruit, especially in Australia’s warmer months.
For short-term storage (up to 4 hours), place the centrepiece in a cool, dry spot, away from direct sunlight. A shaded area with good airflow works well. Avoid refrigerating the completed arrangement, as condensation can form when it’s brought back to room temperature, leaving the chocolate with a cloudy finish.
If you need to store it longer, disassemble the arrangement. Place the individual fruit pieces in airtight containers and refrigerate them for up to 48 hours. When you’re ready to serve, let them sit at room temperature for 15–20 minutes before reassembling the display.
Australian summers require extra care. Assemble your centrepiece in sections, keeping the dipped fruit stored separately until just before your event begins. This approach prevents melting and ensures the chocolate retains its glossy finish.
For outdoor events, keep the centrepiece away from heat sources and use shade structures or umbrellas for protection. If temperatures climb above 30°C, limit display time to 2–3 hours, and have extra fruit pieces ready to replenish the arrangement as needed.
Serving logistics are just as important. Provide small plates and napkins nearby, and prepare a few extra fruit pieces separately. Guests often hesitate to take the first piece from a beautiful display, so having the host break the ice encourages everyone to enjoy the creation. Careful temperature management ensures the centrepiece remains both visually appealing and a delight to share.
sbb-itb-9167268
Variations and Event Styling Ideas
Themed Centrepieces
Once you’ve mastered your beautifully dipped and arranged fruit, you can take it a step further by creating themed centrepieces that tie your event’s design together. These creative touches can transform your display into a true showstopper.
For wedding receptions, a romantic theme works wonders. Picture white chocolate-dipped strawberries paired with dark chocolate-covered figs, surrounded by soft pink roses and delicate greenery. The combination of creamy white chocolate and the deep tones of the fruit creates an elegant contrast that looks stunning in photos.
Birthday celebrations open up a world of possibilities. For a child’s party, you could use bright rainbow sprinkles on white chocolate-dipped apple slices for a fun, colourful display. For a more sophisticated adult milestone birthday, try dark chocolate-dipped pears with a touch of edible glitter or a refined drizzle of white chocolate for a polished look.
Corporate events can benefit from sleek, professional designs. Monochromatic displays, such as dark chocolate-dipped orange slices paired with grapes, create a refined aesthetic that aligns seamlessly with corporate branding.
For an Australian twist, especially during Australia Day or events with a local flavour, think native fruits and a green and gold palette. White chocolate-dipped kiwi slices paired with golden pineapple pieces dusted with shimmer can set just the right tone, celebrating local produce in style.
Seasonal themes are another way to keep your centrepieces fresh throughout the year. In autumn, you might feature fruits like persimmons and pears dipped in spiced dark chocolate. For spring, fresh berries with pastel-tinted white chocolate accents can capture the season’s light and cheerful vibe.
Additional Edible Elements
Adding extra edible elements can elevate both the look and taste of your chocolate-dipped fruit creations. The key is to choose toppings that complement the theme and apply them while the chocolate is still soft, ensuring they stick perfectly.
- Sprinkles and Edible Glitter: These bring an instant festive flair. From rainbow sprinkles for a playful touch to a subtle shimmer of glitter for elegance, they’re always a hit.
- Crushed Nuts: Pistachios on white chocolate-dipped strawberries add a delicate green hue and a nutty flavour, while almonds on dark chocolate-dipped pears offer a sophisticated finish.
- Chocolate Drizzles: A simple yet striking addition, white chocolate drizzled over dark chocolate-dipped grapes creates intricate patterns that look professional.
- Cookie and Cake Crumbs: Crushed Oreo or Biscoff biscuits sprinkled over white chocolate-coated apple slices add crunch and a unique texture.
- Seasonal Additions: Mini marshmallows and crushed candy canes are perfect for winter celebrations, while crushed peppermint candy on chocolate-dipped watermelon offers a refreshing summer twist.
- Edible Flowers: Delicate blooms like violas, pansies, or nasturtiums pressed into the chocolate add an artful and dramatic touch. Just ensure they’re pesticide-free and safe to eat.
These edible accents can also be coordinated with the overall event design for a seamless, polished presentation.
Professional Event Styling Integration
While DIY chocolate-dipped fruit centrepieces are stunning on their own, working with professional event stylists can elevate your event to the next level. Professionals can ensure that your centrepieces blend seamlessly with the broader design, creating a cohesive and memorable atmosphere.
Colour coordination is effortless when stylists match your centrepiece palette with linens, lighting, and other decorative elements. This ensures your chocolate-dipped fruit arrangements don’t just stand out but become an integral part of the event’s overall aesthetic.
Lighting plays a key role, too. Professional event lighting can highlight the glossy chocolate and vibrant fruit without generating heat that might cause melting. Uplighting, in particular, enhances the display while keeping everything food-safe.
Photography is another area where professionals shine. Skilled photographers know how to capture the beauty of your centrepieces, balancing close-up shots with wide-angle views of the venue to tell the complete story of your event.
Event logistics can also be simplified with professional help. Stylists handle setup, temperature controls, and breakdown, so you can focus on enjoying the celebration without worrying about the details. For example, Melbourne-based company One Click Events offers comprehensive packages that include everything from customised centrepieces and photography to specialised lighting and decorative elements like flower walls and light-up letters.
Timing is critical when dealing with temperature-sensitive displays like chocolate-dipped fruit. Professional teams ensure your centrepieces are arranged after lighting and electrical setups are complete but well before guests arrive, keeping everything picture-perfect.
Giant Chocolate Covered Strawberry Floral Tower Tutorial
Conclusion
Creating chocolate-dipped fruit centrepieces is a delightful way to combine elegance and edibility, perfect for Australian events. Pairing fresh, locally-sourced produce with high-quality chocolate not only ensures a visually striking display but also provides a cost-effective way to elevate your celebration. These centrepieces photograph beautifully and can be customised to suit any theme or colour palette.
Whether you’re a DIY enthusiast or prefer a ready-made option, the versatility of these centrepieces is undeniable. Making them yourself allows you to control the flavours, design, and spending. However, keep in mind the time commitment and the challenge of managing chocolate in Australia’s warmer climate.
For larger gatherings or if you’re after a polished finish, collaborating with professional event stylists can be a game-changer. Companies like One Click Events in Melbourne offer all-inclusive services that incorporate chocolate-dipped fruit displays into broader event designs. Their packages often include extras like coordinated lighting, flower walls, and custom printing, ensuring your centrepieces remain flawless while you enjoy the occasion. Their expertise complements the DIY strategies shared in this guide, giving you flexibility in how you approach your event’s decor.
By carefully planning and following the outlined steps, you can create centrepieces that are both practical and stylish. The key is to ensure they harmonise with the rest of your event’s design rather than overpower it.
No matter your approach, these edible creations are sure to become conversation starters, blending the beauty of thoughtful presentation with the simple joy of fresh fruit and decadent chocolate.
FAQs
How do I make sure the chocolate sticks properly to the fruit?
To get the chocolate to stick perfectly to the fruit, it’s crucial that the fruit is completely dry before dipping. Even a tiny bit of moisture can make the chocolate clump or fail to adhere. Use chocolate that’s fully melted and silky smooth for the best finish. For added precaution, gently pat the fruit dry with a paper towel and leave it at room temperature for a few minutes to ensure there’s no lingering moisture.
How can I stop my chocolate-dipped fruit centrepiece from melting at an outdoor event?
To keep your chocolate-dipped fruit centrepiece from melting at an outdoor event, managing the temperature is essential. One practical trick is to place the centrepiece on a large metal tray set over a layer of ice, which helps keep it cool. Another option is to use insulated serving platters or ensure both the fruit and chocolate are thoroughly chilled before assembling.
For added durability, consider using dark chocolate, as it has a higher melting point than milk or white chocolate. Position the centrepiece in a shaded area, away from direct sunlight, to preserve its look and taste. With these easy steps, your centrepiece can stay fresh and stunning for the duration of the event.
How can I customise chocolate-dipped fruit centrepieces to suit a themed event?
Customising chocolate-dipped fruit centrepieces for themed events is a delightful way to enhance your décor. Start by adding edible embellishments like flowers, sprinkles, or coloured drizzles that tie in with the event’s theme. For instance, gold accents can bring a sense of luxury, while soft pastel tones work beautifully for a spring gathering.
You can take it a step further by using themed containers, decorative picks, or ribbons to personalise the display. Match the materials to the event’s style – think rustic wooden trays for a boho-inspired look or sleek glass stands for a modern touch. To make an even bigger statement, arrange the fruit in tiered displays or creative shapes, turning the centrepiece into both a visual and culinary delight.
These thoughtful details can turn your chocolate-dipped fruit into a standout feature for any occasion, whether it’s a wedding, birthday party, or corporate event.